 by
by A Test Print Page is nothing, but the printer test page that helps you check the printer’s efficiency and the colour magnitude pushed through the printer head.
All the modern printers these days have built-in software to test print pages. This helps to check the printer’s ink. The process differs from brand to brand.
The Test Print Page is used to check various things off the printer to check for general maintenance and also solves the troubleshooting with ink cartridges of the printer. It is always advisable to have it available when needed.
What are the problems that a Test Print Page will fix?
The Test Print Page will help reveal and identify any sort of issue the printer can identify, which are the blocked printheads, and helps to match colour replication or alignment issues. Getting the printer issue by printing the test page will help to solve the problem faster.
The Printer Test Page helps to keep the ink constantly flowing in the printer. If the printer is not used for an extended period, the printheads get blocked, or the ink in or around the cartridge will dry up and may even cause blockages or inconsistent ink flow.
Regularly printing a test page helps to maintain the quality of the printer and also its lifespan. This saves money in the long run.
Test a Print Page Online – Simple Test Page for Printer
How to Check a Printer for Test Page?
We all know Inks are expensive. The only thing that everyone wishes to use the valuable ink for a long time. There are these free test print pages of the essential components, like the black and colour printer test pages. This saves ink as much as possible.
The basic instructions to test the print page can be done as follows:
- Scroll to the black or colour test page.
- Go to the relevant page link. This depends on the type of test page that you would like to print.
- Click on Save Image As.
- On saving the printer test page image, right-click on it and click print.
- The Test Page will now be printed.
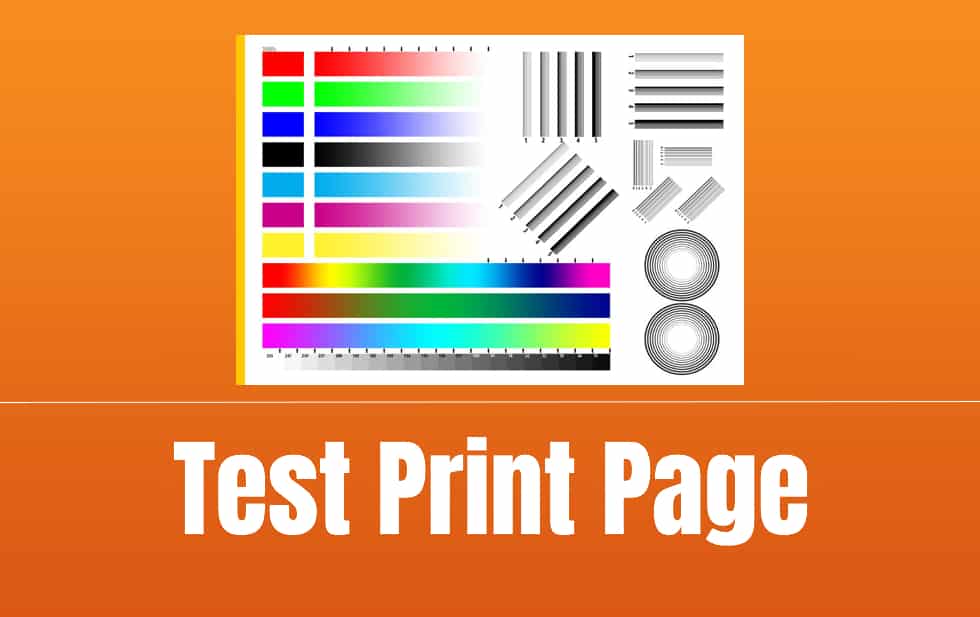
Colour Test Page:
The Colour Test Page is used for the type of printer that uses four or many other colours. The color intensities graph helps to identify the color replication and helps to assist in the flushing of the printhead, the rainbow bars help to align the print head. This helps to stop the flow of colours appearing where they should not flow.
The radial gradients help identify the colour replication and determine the printhead’s capability to sustain the printing of that particular colour.
This colour test page works on every printer, including HP Printer test pages, Canon printer test pages, Epson printer test pages, Brother printer test pages, and many more.
Mono Black and White Test Page:
The black printer test page includes an intensities graph. This works on greyscale. The radial gradients help you see if the print head will print with the perfect amount of colour every time.
The main difference between the white and black graph from the lack of colour is a grid. This works the same as rainbow bars. This helps to align the printhead to get accurate printouts.
The black printer test page works on every printer for test pages. Both the print test pages have small blocks of text. This serves a similar purpose on both sheets.
The Test Page function is the best way to test the computer and printer communication. The print is sent directly from the printer driver, and thus, it helps to determine if the problem occurred as a communication issue or a currently used application.
Follow the below instructions that suit the version of your Windows:
(1) Windows 10
- On your system, go to the Control Panel and select Device Manager. Right-click on your system printer and select Printer Properties. Click on Print Test Page.
- Another method is to click on the start button.
- Select the Settings button in the Start Menu
- Click Devices.
- From the left pane, select Printers & Scanners.
- Select your printer and then click on the button Manage.
- Click on Print a test page.
- The command will be sent to your printer.
(2) Windows 8
- Select the Control Panel by right-clicking on the Start menu.
- Select Devices and Printers from the Control Panel.
- Right-click on the printer on which you would like to test the print page and select the Printer Properties.
- Click on Print Test Page from the Printer Properties tab
- Your test page will start printing now.
(3) Windows 7
- Select the Start button.
- Click on Control Panel.
- In the Control Panel, click on the Hardware and Sound.
- Click on Devices and Printers.
- Right-click on the selected printer you want to use for the test print page and go to Printer Properties.
- Click on Print Test Page in the Printer Properties Window.
- The printer will start printing the test page.
(4) Mac OS
- Select the apple icon and click System Preferences.
- Double-click on Printers & Scanners.
- Select your preferred printer and click on Options & Suppliers.
- Select Utility.
- Click on Print Test Page.
- The Printer will print the test page.
(5) Linux/Ubuntu
- Go to Menu, click on System and then select Printers.
- Right-click on your preferred printer and go to Printer Properties
- Click on the Print Test Page in the printer properties.
- Print your test page.
What if you are not able to Print the Test Page at all?
Check the points below if the printer connected to your system is not printing.
- Ensure that you have installed the ink cartridges correctly and in the correct slot of every cartridge.
- Check for the printer tab or even the tape covering the air hole, if it is removed completely that is placed above the cartridge. This helps the easy airflow and release of ink from the cartridges.
- If the printer cannot print the test page, restart your printer. Remove the ink cartridges and disconnect your system’s power supply for a few minutes.
- Many printers can print the test page as a self-test option. The printer in this process will go through a few diagnosis processes where the printer is not connected to the system.
- Check if the system you are using has a self-test mode readily available. Check the instruction manual for better guidance.
- Ideally, it is required to press many buttons to run the printer test page. In case the printer can run the self-test pages but at the same time fails to answer the printer test page from the Windows system, this means that there is a software issue. The problem can be with the drivers or any other files associated with the printer you selected.
- Check for the printer’s drivers by visiting the official website of your printer manufacturer.
Troubleshooting
- You can troubleshoot the problems by checking for any paper jams in your printer. Remove if you find any stuck sheets and try to test the print page again.
- Check the ink levels of the printer. If the printer is running out of ink, it will stop printing. Replace the old cartridges with the new ones.
- Make sure that you have connected the system and the printer cables properly. If there is a loose cable, it will prevent the printer from functioning.
- Update the printer’s drivers by clicking the Start button, choosing All Programs, and selecting Windows Update. Select Check for Updates and then click on Install Updates. At the same time, you can go directly to the manufacturer’s website of your printer and download all the necessary drivers. Install the required drivers.